Hello everyone how have we been?? I thought I would start using my blog a lot more than I have been and I feel terrible because I love all of my supporters and I feel like some of my readers don't always watch my videos or want to watch them which is totally awesome! So I think I want to do some positivity posts and journal on here everyday for you guys! It will be something of the sort but to start this off I wanted to let you know that my new video is up and you can watch it HERE! But also I wanted to have more big discussions on my blog so with that being said lets chat it up all week long!!
My question for you guys is who are you? Now I would really love it if you guys would answer down below but if not that is totally okay! I guess I will start first haha. :)
Who I am...
I am a 19 year old girl who thought she knew what she was going to do with her life and is now realizing that she wants to go another direction but she is also crazy and confused. She is someone who just wants to take life one step at a time and just stop planning everything. She isn't quite there yet but that is her goal!
Now please please please let me know in the comments I would love for everyone to just start a huge conversation about this topic below.
Thank you guys so much for reading and I will talk to you guys in the comments.
Monday, April 6, 2015

Friday, March 20, 2015
3-in-1 Review of Garnier, MAC & Revlon!
Hey guys it has been awhile since I have posted a video or
even a blog! Which is just so crazy but if you want to see more new and
exciting updates about me watch my new video. LINK HERE
So
first things first I am going to talk about the Revlon Colorstay Concealer in
02 Light. Which I do have to say is a little to dark for me but I made it work.
This shade has a yellow undertone to it and is full coverage. This product does
crease under the eyes but a little setting powder wont let that happen! I love
using this as a highlighting product to make you look more awake. I love the
formulation and how it blends out like a dream! I would use a sponge to blend
this out underneath my eyes in a patting motion and to cover blemishes I
applied and blended it out the same way. It covers up redness wonderfully. It
is a very good product but there aren’t very many shades in the line. PUT
AMAZON LINK HERE. This retails for $8.99 on Amazon.
For the
Garnier Nutrisse Moisture Rescue for Normal/Combo skin, is a really great
moisturizer for teens, pre-teens or really anyone new to the skincare world. I
really recommend this because it absorbs quickly. If you have dry patches that
aren’t noticeable to you then this is perfect. It hydrates just enough, but it
doesn’t make you look oily. This is actually the second bottle I have went
through. I like the fact that it is a gel formula and that it is transparent
because you have really thick foundations that just need to be a little more on
the liquid side you can just add in a little of this and it just makes it to
the consistency you need and doesn’t change the shade of the foundation. It
smells like cucumber and aloe which is nice and soothing and I love the cooling
effect it gives me in the morning. WALMART LINK HERE. This retails for $6.79
at Walmart.
Okay
last but not least is the amazing MAC Penultimate Eyeliner. Now in the video I
said that this retailed for $19.00, well it went up (but only a dollar) so it
is now $20.00. Which is still good for a MAC product. I really love this
eyeliner because like I said in my video, it is 100% FOOL-PROOF! I mean if you
cant achieve the wing eyeliner (which neither can I ) you NEED this in your
life. This is going to save you time and frustration. You will definitely get
your perfect wing on the first try, on both eyes. I use this every single day
and I love it! MAC LINK HERE.
What do
you want me to review next? Leave it in the comments here or on my video which
is à LINK TO VID HERE
Series: Design of the Week. Week 1
Today I thought that I would just introduce you guys to my new weekly series that I am going to be doing every Wednesday from now but I am debuting it on a Saturday! I thought for this one I would let you guys know what I use and just do something simple but in this post I am going to explain to you guys what you will be seeing!
So I am going to be doing nail art, such as stamping, using stripers and dotting tools and simple looks like I did for this post! I will use decals, rhinestones and glitter! The occasional pedicure and acrylic set too! I am a professional nail technician I graduated in 2014 about a week before my birthday. Lol
So what I did to start off this whole thing was lay down a white nail towel that I got from Sally's Beauty Supply. The next thing I like to do is to make sure my natural nail is free from any oils and dirt that may be on my nails, so for that I take Hands Down Nail Pads and use just regular nail polish remover and clean off my nails. You could also use a dehydrator for this but if that isn't handy for you then polish remover is just fine!
Now I like to push back my cuticles I normally like to take either a metal pusher or the orange wood sticks with a flat edge. I couldn't find my metal pusher so I had to use the wooden one. But anyway after I push my cuticles I am going to apply my favorite base coat!
My favorite base coat is CND Stickey Base Coat which is amazing. The name fits it perfectly because the color does actually stick to the base coat. So for my color I have been LOVING Revlon Gel Envy in Wild Card which is a beautiful cream finish and in an Indigo color. To top it off since this is a little boring but beautiful I topped it off with Deborah Lippman's Va Va Voom. which is an amazing Indigo blue holographic glitter topper. I absolutely love it and it was a gift from my uncle T for Christmas!
Now to top everything off I use my favorite top coat as well and it is the CND Super Shiney Top Coat. It is super glossy and I love it! To clean up around the cuticles I just used that orange wood stick and that it!
So I am going to be doing nail art, such as stamping, using stripers and dotting tools and simple looks like I did for this post! I will use decals, rhinestones and glitter! The occasional pedicure and acrylic set too! I am a professional nail technician I graduated in 2014 about a week before my birthday. Lol
So what I did to start off this whole thing was lay down a white nail towel that I got from Sally's Beauty Supply. The next thing I like to do is to make sure my natural nail is free from any oils and dirt that may be on my nails, so for that I take Hands Down Nail Pads and use just regular nail polish remover and clean off my nails. You could also use a dehydrator for this but if that isn't handy for you then polish remover is just fine!
Now I like to push back my cuticles I normally like to take either a metal pusher or the orange wood sticks with a flat edge. I couldn't find my metal pusher so I had to use the wooden one. But anyway after I push my cuticles I am going to apply my favorite base coat!
My favorite base coat is CND Stickey Base Coat which is amazing. The name fits it perfectly because the color does actually stick to the base coat. So for my color I have been LOVING Revlon Gel Envy in Wild Card which is a beautiful cream finish and in an Indigo color. To top it off since this is a little boring but beautiful I topped it off with Deborah Lippman's Va Va Voom. which is an amazing Indigo blue holographic glitter topper. I absolutely love it and it was a gift from my uncle T for Christmas!
Now to top everything off I use my favorite top coat as well and it is the CND Super Shiney Top Coat. It is super glossy and I love it! To clean up around the cuticles I just used that orange wood stick and that it!
Friday, November 21, 2014
Cleaning Makeup Brushes and Beauty Blenders or Sponges.
Okay so I thought I would do a quick and easy post and share with you all how I clean my brushes and my beauty blender. I know there are many videos and blog posts about this and I guess I am just going to kind of show you my way. I mean there really isn't a wrong way as long as you are cleaning your brushes without damaging them then you keep doing you! haha Lets get on with it shall we?
Okay so the things that I use are Mild Baby Shampoo, Olive Oil and a Bar of Soap. So the first thing I like to do is literally just use my hand and put the baby soap in it and then I will grab my brush and swirl it in the soap and then run it under the warm water and just keep repeating until its clean! After I do that to all of my brushes then I move onto the Olive Oil step which is to help condition and clean my brushes even more. I basically do the same process with those and then I am done.
Now for my beauty blenders and sponges I like to use a solid soap. You can do this with the knock off beauty blenders, or even the throw away makeup sponges and just get a few more uses out of them than normal. So what I do is I will just get the soap and sponge wet and just rub the sponge over the soap and then I just keep doing that same process until the warm water runs clean. That is very simple to clean them, I find that using a solid is a lot easier to get rid of all the soap and dirt as opposed to using a liquid.
So for drying my brushes I just set them at an angle with the bristles pointing down that way all of the water runs out of the barrel. I set them on top of a towel and literally propped up with books or something I find lying around. For the sponges I just make sure I have gotten all of the water out of them and just lay them where ever on my towel and they should all be dry by morning.
Now you should clean your brushes every two weeks or depending how often you use them, but lets be real I hardly ever clean my brushes which I know is bad but it is a pain in the but!
Anyways I hope this helped you with some ideas and let me know in the comments how you clean your brushes and sponges!!! <3 Emily
Okay so the things that I use are Mild Baby Shampoo, Olive Oil and a Bar of Soap. So the first thing I like to do is literally just use my hand and put the baby soap in it and then I will grab my brush and swirl it in the soap and then run it under the warm water and just keep repeating until its clean! After I do that to all of my brushes then I move onto the Olive Oil step which is to help condition and clean my brushes even more. I basically do the same process with those and then I am done.
Now for my beauty blenders and sponges I like to use a solid soap. You can do this with the knock off beauty blenders, or even the throw away makeup sponges and just get a few more uses out of them than normal. So what I do is I will just get the soap and sponge wet and just rub the sponge over the soap and then I just keep doing that same process until the warm water runs clean. That is very simple to clean them, I find that using a solid is a lot easier to get rid of all the soap and dirt as opposed to using a liquid.
So for drying my brushes I just set them at an angle with the bristles pointing down that way all of the water runs out of the barrel. I set them on top of a towel and literally propped up with books or something I find lying around. For the sponges I just make sure I have gotten all of the water out of them and just lay them where ever on my towel and they should all be dry by morning.
Now you should clean your brushes every two weeks or depending how often you use them, but lets be real I hardly ever clean my brushes which I know is bad but it is a pain in the but!
Anyways I hope this helped you with some ideas and let me know in the comments how you clean your brushes and sponges!!! <3 Emily
Wednesday, November 19, 2014
Shellac and Gel Reviews China Glaze, CND & ASP!
Hey guys I hope you are all enjoying your wonderful Wednesday! I am currently laying in bed waiting for my boyfriend to get off work and then it will be movie time hopefully! lol I made some delicious snow ice cream which I love right now. Since for some weird reason there is like 3 inches of snow outside before Thanksgiving but whatever, I get some amazing ice cream from it! Lets get on with the review shall we?...
Okay so I am going to start by talking about the CND Shellac (since I only own 2 bottles) . But to clarify I am reviewing the colors and also the longevity and things like that. You know me I love being in depth! haha
Okay so the first color is called Clearly Pink. Basically it is a clear pink, mainly used for french manicures. Now the second color I own is called Cake Pop. This is a very light lilac pink and I LOVE IT! It is so creamy and pigmented. Although when you apply it, it is streaky so beware of that! For CND's formula it is very thick (which is good) and it stays in place for the most part it doesn't seem to pull away from the tip of your nail, but it does seem to spread more which can be bad if you aren't careful. I really do enjoy CND's packaging but it is very deceiving..meaning it looks like clearly pink is going to be a light nude/peach shade but it obviously isn't. Now I know it clearly states it in the name but hey some clients don't read the name lol! CND lasts for about 2 weeks if you have avoided doing yard work and dishes. This product retails for about $15.00. The size of this product is .25fl oz or 7.3mL. What I really do like about this is that the brush is like a normal polish brush. Sometimes I find that the brushes are really short and just hard to work with but these I have no problem with! You can buy Clearly Pink HERE and Cake Pop HERE. Now keep in mind these need to be cured in a LED light or UV light.

Now onto the next brand which is ASP. This is actually a great find for me! I found these at my local Sally's Beauty Supply and they are only $9.99 I believe and they are really great quality. Right now their color selection isn't great because they are new this year to the company. The formulation is great and the pigmentation is spot on! The first color I want to talk about with you is Tease Me Turquoise which is a beautiful turquoise and is literally opaque within one coat. I mean I still apply the second layer but that is great, It isn't even streaky or anything which I love! It has a beautiful shimmer to it which is very fine. The next color is I'm Royalty Purple which is a dark plum color with gold and purple fine shimmer in it. The next color is called Passionate Pink which is the typical barbie pink with a gold shimmer to it. The brushes on these are wider than the CND brushes which is what I prefer. The consistency of this product is just like nail polish a little thicker but not much. Now you might all be thinking well for 9.99 they must be a lot smaller than CND and actually they are bigger. You get .30 fl oz or 9mL which is great! For the packaging I really do like it, it is nice and simple and is actually showing the true color. Now I have two more colors which is White Hot and Black Beauty...yes you guessed it a cream white and a cream black. They are both really great and super pigmented, not streaky even though it is a cream finish and OMG they are perfect! So the only thing I noticed that was a lot different from any of the polishes I am about to talk to you about is the smell. CND just smelt like regular polish now these ones just have a distinct smell to them..it almost smells a little more chemically to them so I'm not sure why that is but they are great! Plus since you can purchase these at Sally's if you have a card you can get them for $8.99 or if you are a pro they are $7.99! Purchase your ASP Gel Polishes HERE.

For the last brand I am going to be talking about and that is China Glazes Gelaze. Now these are basically China Glazes permanent and popular shades turned into a Gel formula! These retail for $11.99 and they are .33fl oz or 9.76mL. So you are getting more than CND and ASP but you are going to pay more than ASP and a little less than CND. So as far as the colors that I own I have Orange Knockout, Celtic Sun, Pink Voltage and In the Lime Light, these are all bright neon's which are perfect for the summer. These are again mostly opaque except for Celtic Sun. I also have Re-Fresh Mint and Peachy Keen which are two pastel shades. For this formula they are all pretty opaque and they are the same consistency as the ASP, like nail polish but a little thicker.These polishes also seem to have a different smell to them as well so maybe it just depends on the formulation. Now these polishes do pull away from the tip very badly so I suggest flash curing them in the light for 30 seconds or something.You can also get these at Sally's so again i you have the card you can get them for $10.99 and if you are a pro even less! I really do enjoy the packaging though, the outside actually looks like what you are getting and it is cute with the white caps! Purchase your Gelaze Polishes HERE!

So guys I am going to list my favorites in order best to worst. So my top favorite is ASP then CND and then Gelaze. The reason for that is because ASP is affordable and great quality and then CND is great quality but a bit more pricey and then Gelaze because it pulls away from the tip a lot! The formulation for Gelaze just needs a lot of work.
Let me know if you guys would like to see a review on the Red Carpet Gel Polishes because I have like a ton of those polishes that could literally only fit on one post! haha Anyways have a great Wednesday. <3 Emily
Okay so I am going to start by talking about the CND Shellac (since I only own 2 bottles) . But to clarify I am reviewing the colors and also the longevity and things like that. You know me I love being in depth! haha
Okay so the first color is called Clearly Pink. Basically it is a clear pink, mainly used for french manicures. Now the second color I own is called Cake Pop. This is a very light lilac pink and I LOVE IT! It is so creamy and pigmented. Although when you apply it, it is streaky so beware of that! For CND's formula it is very thick (which is good) and it stays in place for the most part it doesn't seem to pull away from the tip of your nail, but it does seem to spread more which can be bad if you aren't careful. I really do enjoy CND's packaging but it is very deceiving..meaning it looks like clearly pink is going to be a light nude/peach shade but it obviously isn't. Now I know it clearly states it in the name but hey some clients don't read the name lol! CND lasts for about 2 weeks if you have avoided doing yard work and dishes. This product retails for about $15.00. The size of this product is .25fl oz or 7.3mL. What I really do like about this is that the brush is like a normal polish brush. Sometimes I find that the brushes are really short and just hard to work with but these I have no problem with! You can buy Clearly Pink HERE and Cake Pop HERE. Now keep in mind these need to be cured in a LED light or UV light.
Now onto the next brand which is ASP. This is actually a great find for me! I found these at my local Sally's Beauty Supply and they are only $9.99 I believe and they are really great quality. Right now their color selection isn't great because they are new this year to the company. The formulation is great and the pigmentation is spot on! The first color I want to talk about with you is Tease Me Turquoise which is a beautiful turquoise and is literally opaque within one coat. I mean I still apply the second layer but that is great, It isn't even streaky or anything which I love! It has a beautiful shimmer to it which is very fine. The next color is I'm Royalty Purple which is a dark plum color with gold and purple fine shimmer in it. The next color is called Passionate Pink which is the typical barbie pink with a gold shimmer to it. The brushes on these are wider than the CND brushes which is what I prefer. The consistency of this product is just like nail polish a little thicker but not much. Now you might all be thinking well for 9.99 they must be a lot smaller than CND and actually they are bigger. You get .30 fl oz or 9mL which is great! For the packaging I really do like it, it is nice and simple and is actually showing the true color. Now I have two more colors which is White Hot and Black Beauty...yes you guessed it a cream white and a cream black. They are both really great and super pigmented, not streaky even though it is a cream finish and OMG they are perfect! So the only thing I noticed that was a lot different from any of the polishes I am about to talk to you about is the smell. CND just smelt like regular polish now these ones just have a distinct smell to them..it almost smells a little more chemically to them so I'm not sure why that is but they are great! Plus since you can purchase these at Sally's if you have a card you can get them for $8.99 or if you are a pro they are $7.99! Purchase your ASP Gel Polishes HERE.
For the last brand I am going to be talking about and that is China Glazes Gelaze. Now these are basically China Glazes permanent and popular shades turned into a Gel formula! These retail for $11.99 and they are .33fl oz or 9.76mL. So you are getting more than CND and ASP but you are going to pay more than ASP and a little less than CND. So as far as the colors that I own I have Orange Knockout, Celtic Sun, Pink Voltage and In the Lime Light, these are all bright neon's which are perfect for the summer. These are again mostly opaque except for Celtic Sun. I also have Re-Fresh Mint and Peachy Keen which are two pastel shades. For this formula they are all pretty opaque and they are the same consistency as the ASP, like nail polish but a little thicker.These polishes also seem to have a different smell to them as well so maybe it just depends on the formulation. Now these polishes do pull away from the tip very badly so I suggest flash curing them in the light for 30 seconds or something.You can also get these at Sally's so again i you have the card you can get them for $10.99 and if you are a pro even less! I really do enjoy the packaging though, the outside actually looks like what you are getting and it is cute with the white caps! Purchase your Gelaze Polishes HERE!
So guys I am going to list my favorites in order best to worst. So my top favorite is ASP then CND and then Gelaze. The reason for that is because ASP is affordable and great quality and then CND is great quality but a bit more pricey and then Gelaze because it pulls away from the tip a lot! The formulation for Gelaze just needs a lot of work.
Let me know if you guys would like to see a review on the Red Carpet Gel Polishes because I have like a ton of those polishes that could literally only fit on one post! haha Anyways have a great Wednesday. <3 Emily
Monday, November 17, 2014
Volumizing Hair Care Routine (Drugstore)
Hey guys happy Monday! I hope you are having a wonderful day;
I currently have had a productive day. Took my boyfriend to work, balanced my
mom’s nails and now working on this blogpost. What’s up with you guys?
So for the past couple months I have been obsessed with
finding the perfect and affordable routine for my hair. SO with that being said
I think I found it...for now anyways ha-ha. So let me tell you about my hair.
It is VERY VERY damaged from bleaching and I also have a little bit of
breakage. I have very fine hair that is getting finer as we speak since my hair
is falling out due to my medication and it is to my collarbone when flat ironed
and also my hair is naturally straight and currently getting out of a dry spell
that it likes to have. Now let’s move onto the products.
So the first one is my shampoo this right here is a life
saver! Before I was using crap on my hair that was also from the drugstore and
I will get onto that later in the post. But this...has changed my life
completely (I know sounds dramatic but it is literally so true). It is the
Clairol Hair Food Volume Shampoo Infused with Kiwi Fragrance. Not only does
this smell amazing and refreshing it actually gives you volume and it actually
like cleans your hair! It doesn't leave any residue from itself or any products
you have used prior to your washing which is great! The other cool thing I
noticed about this product is that it is Silicone Free, Paraben Free as well as
Mineral Oil Free. Now I had no idea why it was a good thing for this shampoo to
not include these ingredients so I did some research for you guys and this is
what I found out...basically there are two types of silicones and really
neither of them is terrible for the hair. There is a water soluble silicone and
a non-soluble silicone. The difference between them is that the water soluble
can be rinsed away with just water and the non-soluble silicone can't be rinsed
away with just water. Either of these silicones aren't good or bad but if you
have super dry hair (like me) then they might not be right for you since
silicone basically coats your hair to make it appear healthy and it creates a
barrier around your hair so that oils and things can't penetrate your hair. But
really it just depends on how your hair reacts to it. Now you might be thinking
why is parabens a bad ingredient for my shampoo? Well first off you might be
thinking aren't parabens good since they are keeping bacteria and fungus from
growing in our beauty products? Well there is a huge debate on whether or not
it is damaging our health. Researchers aren't quite sure yet if it is actually
causing breast cancer or other things but some people can be weary and might
like to just stay away from the ingredient completely and I don't blame them.
Parabens have been used for over 70 years but hey maybe our bodies aren't
liking that ingredient anymore? And finally why is Mineral Oil bad for your
hair? Mineral Oil actually does the opposite of what it sounds like...it
actually creates a barrier around the hair keeping good moisture and nutrition
out.

Now I know that was a lot to take in so let’s take a
breather and move onto the fun stuff. What really drew me to this product was
actually the packaging and then of course the scent. Packaging is very nice and
sleek and it is actually a pump instead of having to squeeze it out which is
nice. Now the scent oh my god...it is delicious. It isn't overpowering and like
oh your hair smells like kiwis..It smells great in the shower and then once it's
dry it just smells fruity but not like a strong scent...ya get what I'm sayin'?
Ha-ha.
So this product is more on the pricey side at the drugstore
but what it does for me is amazing so honestly it is worth it! It retails for
$9.99 and I picked mine up at Target you can purchase yours HERE. The size of
this product really makes up for the price you get 17.9 FL OZ which is equivalent
to 530ml. So to apply all I do is just lather it into my wet hair and then I
move onto the next step which is the conditioner. Now it is not the matching
hair food conditioner but I am definitely going to try it once I am done with
my next product although I love this one too ha-ha.
For my conditioner I use the Palmers Coconut Oil Formula
Repairing Conditioner (this also has a matching shampoo but I just opted for
the conditioner at the time...but I will definitely give this shampoo a try as
well.) This product retails for $4.99 and can be purchased HERE. The reason I
wanted to try this product was because I have heard such great things about
putting coconut oil in your hair but I could never find coconut oil at my
grocery store so I decided to give this a go and I absolutely love it! This
product also has some great benefits to it as well. It doesn't contain sulfates
and it is also paraben free. Now I you aren't sure why sulfates are bad for
your hair (because honestly I didn't know either) I did some research for us
all. Sulfates are cleaning agents. Sulfates are what make the product lather
up. Now why it is bad for your hair is because it dries out your hair and can
also cause scalp irritation and maybe even worsen your dandruff or eczema for
example and it can also clog your pores. Now I just apply this product to the
ends of my hair and sometimes I will apply all over but that’s a once a week
kinda thing for me. Then I just use a Conair clip and clip up my hair and wash
my body and whatever else a girl has to do in the shower.

Now enough with all of that complicated talk. The scent of
this product is not an overwhelming scent of coconut. I know some people aren't
a huge fan of the scent but hey if it is helping your hair then why not? Also
this product states that it is for fine, limp hair...now that doesn't mean you
can't use it on thick coarse hair it just means that it isn't going to weigh
your hair down if it is fine. Which I have found with deep conditioners that
they do end up weighing down my fine hair and that is just not cool lol. I need
all the volume and help I can get. Some other benefits is that it contains
Vitamin E, Keratin and of course the obvious Coconut Oil. Now you might be
asking yourself why these ingredients are so beneficial. Well you already know
I am going to tell you I did all of the research for you so let me go on and
explain. Vitamin E is great for preventing hair loss and promoting hair growth.
It is also great for pre-mature greying, giving us lustrous hair and repairing
our split ends. Keratin is actually a huge debate as well...sometimes it isn't
good for your hair and sometimes it can be. It is kind of like the silicone I
talked about earlier. If you like to use keratin on your hair then you won't
mind...if you don't like keratin then maybe stay clear of this product but I
don't think there is a huge amount of keratin for anyone to be concerned about.
Now for the coconut oil it is just super hydrating to the hair and gives the
hair good nutrition.
The size of this product is 8.5FLOZ which is equivalent to
250ml. This product also claims to repair and renew dry, damaged hair and let
me tell you it has for me. I definitely recommend this product to anyone if
their hair feels like straw or if you have a lot of split ends or breakage just
try it!
The final product I use on my hair is the its a 10 miracle
leave in product. Just something a little extra for my dry hair. I apply this
all over my hair and I will just comb it through my hair. The size of this
product is 2FLOZ or 59.1ml. It just smells like a salon hair care product,
which in my opinion smells really good. This product retails for 11.99 and I actually
picked mine up at Ulta. Then from there I will either blow dry or air dry
depending on what I am in the mood to do ha-ha.

Okay guys so pretty much the result is I get bouncy, clean
moisturized and volumized hair with just 3 products and it costs me $26.00
every 2 to 3 months! (Not bad if I do say so myself) I hope you guys enjoyed
this post and if you have any products that work for you let me know in the
comments because I always love trying out new hair products. <3 Emily
Saturday, November 15, 2014
Foundation Review: Loreal Paris True Match Lumi
So I wanted to bring you a review of the Loreal Paris True Match Lumi Foundation. This item retails for 9.99 and can be purchased HERE.
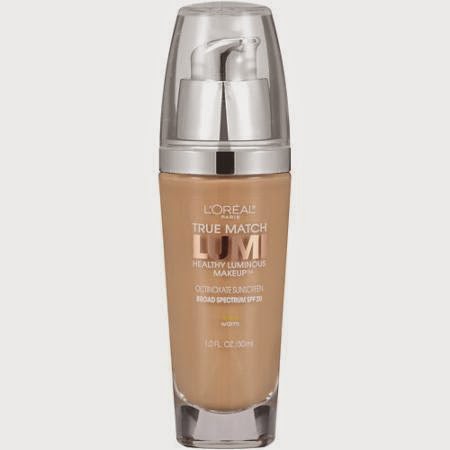
So I guess lets talk about the Pros for this product I do like the packaging, I like that it does have a pump, plus it is very sleek and simple. I also love the finish of this product as well. I don't think that this item is over priced for a drugstore item. Really there isn't much else that i enjoy about this.
Here are the Cons: I can't find the perfect shade for my skin tone because it has too much of a pink undertone for me no matter what shade I try, I can make the shade classic ivory work for me. Then also I find that this really is attracted to my dry patches which is weird and I also finds that this takes forever to set on my face and it still feels sticky on my face and slides everywhere, with or without a primer and I have even set it with a powder but that kind of defeats the purpose, AMIRIGHT? haha anyways this is just a quick review for me for this wonderful Saturday.
If you guys can think of anyway this product might work for me let me know in the comments! I don't want my money to go to waste so I will be mixing this in with my new foundation I bought that I love and if you are interested in my updated drugstore foundation routine then CLICK HERE.
Hope you have a great weekend and enjoy yourselves! <3 Emily
Subscribe to:
Posts (Atom)